Quickstart
info
This quickstart was made with version 4.0.0 of the CLI. The CDK version can be checked using tray-cdk version.
Make sure you check out the sample connectors repo here for more examples/use cases.
For the purpose of this quickstart, we will use TMDB (The Movie Database) APIs. We will create a new connector operation to Get Top rated movies that will use the /movie/top_rated endpoint from TMDB.
Prerequisites
-
You have installed the
cdk-cliby following the Introduction . -
You have obtained a
namespace. You won't be able to deploy the connector otherwise. To get anamespace, please create a support ticket . - Signup for a new account on TMDB (Skip this step if you already have one)
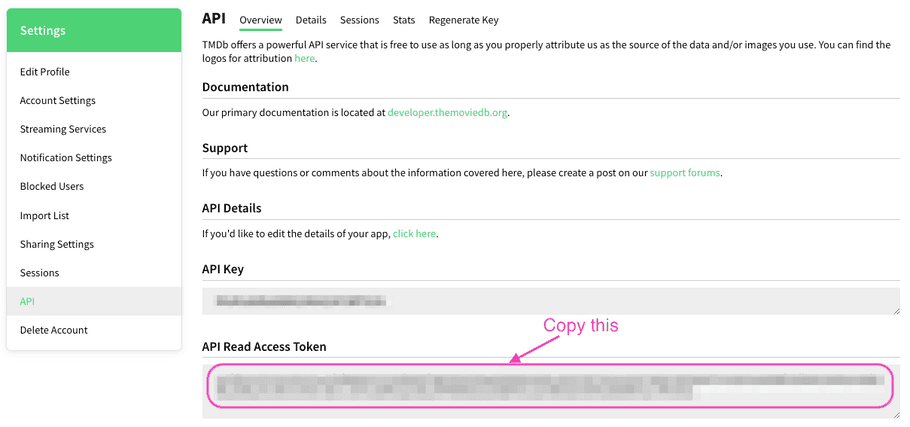
- Once logged in, create an API access token by going to the TMDB settings page
info
For generating an access token, you need to fill in the app details.
Here's an example of what you can fill in the app details:
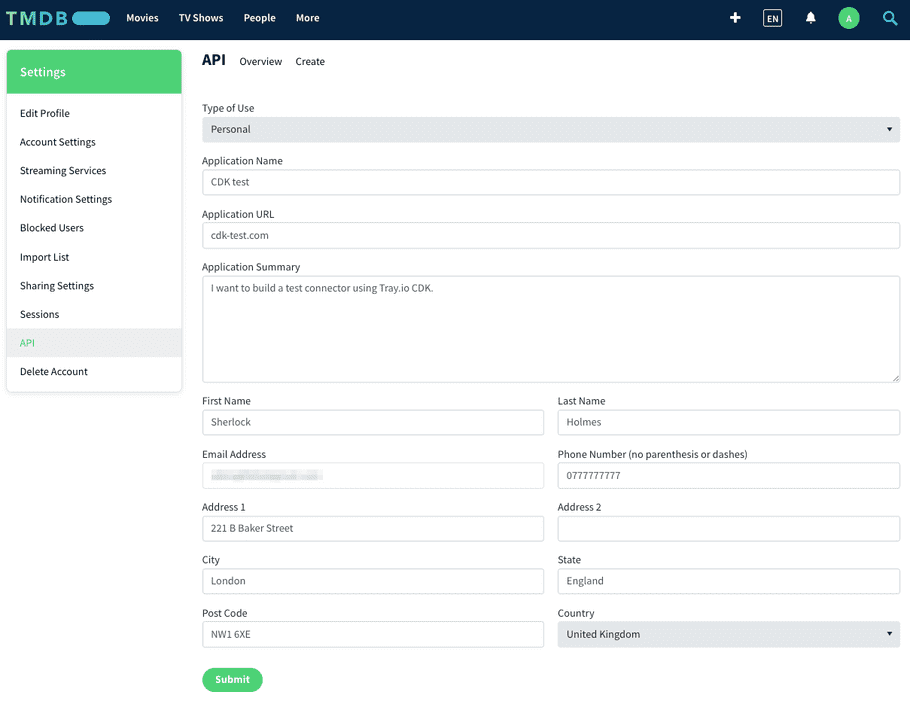
This will generate an access token for you. Copy this, and keep it ready for the next steps.
Test the 3rd party API
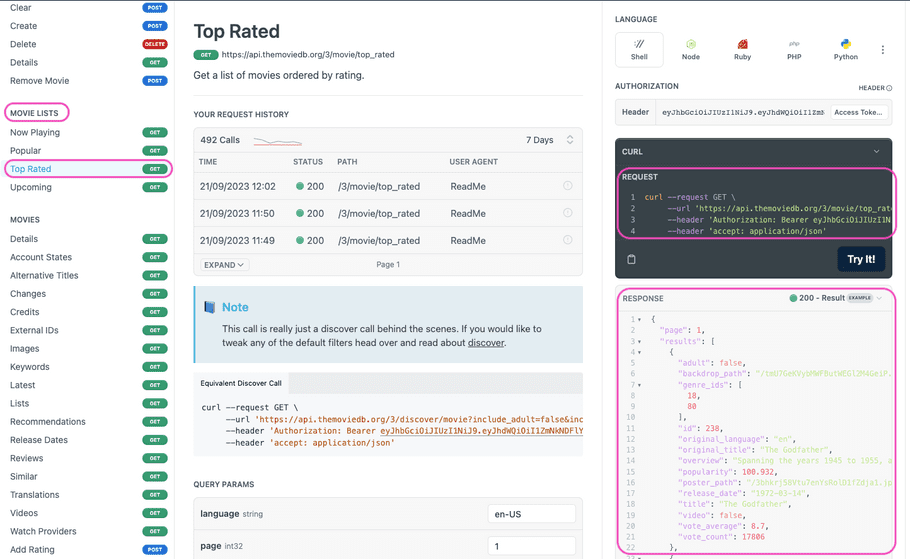
Before we build an operation using CDK, we should test the API endpoint to view the standard request and response format.
Click on the Try it button on the endpoint reference page.
info
If you are logged in to TMDB, your API access token will be auto picked in the Try it console.
Note that not all 3rd party APIs have an in-built Try it console.
We recommend using tools like Postman to test the endpoints before building them with CDK.
Create a new Connector project
Now open a terminal window in the folder where you want to build your TMDB connector project.
For example, this could be ~/projects/tray-connectors
Initialize project
Then run the following command:
tray-cdk connector init [CONNECTOR_NAME]
Where [CONNECTOR_NAME] is the name of your connector eg. tray-cdk connector init acme-tmdb
info
We recommend doing the next steps in a terminal window within an IDE such as VS Code so you can visualize the folder structure.
Install dependencies
cd to the newly created connector folder e.g. cd acme-tmdb
Now run:
npm i
This will install the project dependencies.
info
Tip: When intializing a project, you can simultaneously install the dependencies using the -i or --install flag e.g. tray-cdk connector init acme-tmdb -i
Test your installation
Each time a project is initialized a test connector with one operation get_post is installed.
To test your setup, you can run:
npm test
You should see the following message in your terminal:
> acme-tmdb@1.0.0 test
> jest --config ./jest.config.js

 PASS  src/get_post/handler.test.ts
  Operation get_post Test
    ✓ should get a product (353 ms)

Test Suites: 1 passed, 1 total
Tests:       1 passed, 1 total
Snapshots:   0 total
Time:        1.316 s
Ran all test suites.
Delete the test operation
Delete get_post folder from your src.
This will remove the operation from your connector.
Add authentication
Upon initializing the connector three files were created in root of src folder:
-
[Connector Name]Auth.ts: This will define the types for auth that is passed with the request. -
test.ctx.json: This will hold the the context variables including the test auth credentials. -
GlobalConfig.ts: This will define the global configs e.g. baseUrl, custom Headers etc. that will remain same with every request.
[Connector Name]Auth.ts
Since TMDB uses token auth, we need to import TokenOperationHandlerAuth from the cdk-dsl
import { TokenOperationHandlerAuth } from "@trayio/cdk-dsl/connector/operation/OperationHandler";info
CDK supports a variety of auth types including Token, OAuth1 and OAuth2. Command + click (CTRL + click for windows) on TokenOperationHandlerAuth in your code to check the other auth types in the DSL.
export type TokenOperationHandlerAuth<USER, APP> = OperationHandlerAuth<
  USER,
  APP
> & {
  authType: "TOKEN",
};
export type Oauth1OperationHandlerAuth<USER, APP> = OperationHandlerAuth<
  USER,
  APP
> & {
  authType: "OAUTH1",
};
export type Oauth2OperationHandlerAuth<USER, APP> = OperationHandlerAuth<
  USER,
  APP
> & {
  authType: "OAUTH2",
};
export type Oauth2PasswordOperationHandlerAuth<USER, APP> =
  OperationHandlerAuth<USER, APP> & {
    authType: "OAUTH2_PASSWORD",
  };
export type Oauth2ClientCredentialsOperationHandlerAuth<USER, APP> =
  OperationHandlerAuth<USER, APP> & {
    authType: "OAUTH2_CLIENT_CREDENTIALS",
  };
export type BuiltinOperationHandlerAuth<USER, APP> = OperationHandlerAuth<
  USER,
  APP
> & {
  authType: "BUILTIN",
};
All auth types need to follow a predefined schema as shown here:
export type UserAuth = {
  //user credentials
}

export type AppAuth = {
  //OAuth app credentials
}

export type <Prefix for auth>Auth = TokenOperationHandlerAuth<UserAuth, AppAuth>
Since TMDB uses a token auth, we can leave AppAuth blank and token can be added under UserAuth.
Here's the full [Connector Name]Auth.ts file for reference:
import { TokenOperationHandlerAuth } from "@trayio/cdk-dsl/connector/operation/OperationHandler";

export type UserAuth = {
  access_token: string, //you can call this property anything e.g. token, auth_token etc.
};

export type AppAuth = {};

export type AcmeTmdbAuth = TokenOperationHandlerAuth<UserAuth, AppAuth>;
test.ctx.json
access_token has to be added to test.ctx.json for the test to run successfully:
{
  "auth": {
    "user": {
      "access_token": "<API Access Token>"
    }
  }
}
GlobalConfig.ts
Lastly, you can define some global configs that will be applied to all operations.
This file uses OperationGlobalConfigHttp to create a Global config object.
The object provides several functions that can be used to add configs, e.g.:
withBaseUrl function can be used to define a baseUrl
withBearerToken can be used to configure a Bearer auth
info
Tip: You can use addHeader method to add custom headers. For example, you service required a header called x-api-key to call authorized endpoints. You can define this header here and it will be available across all operations.
Here's the full GlobalConfig.ts file for your reference:
import { OperationGlobalConfigHttp } from "@trayio/cdk-dsl/connector/operation/OperationGlobalConfig";
import { TmdbAuth } from "./TmdbAuth";

export const globalConfigHttp = OperationGlobalConfigHttp.create<TmdbAuth>()
  .withBaseUrl((_ctx) => `https://api.themoviedb.org`)
  .withBearerToken((ctx) => ctx.auth!.user.access_token);
In the code block above, the baseUrl has been hardcoded but it can very well come from auth of the user e.g. mailchimp where baseUrl depends on your datacenter id.
In that case your test.ctx.json and GlobalConfig.ts will look like:
{
  "auth": {
    "user": {
      "base_url": "<BASE URL>"
      "access_token": "<API Access Token>"
    }
  }
}import { OperationGlobalConfigHttp } from "@trayio/cdk-dsl/connector/operation/OperationGlobalConfig";
import { TmdbAuth } from "./TmdbAuth";
export const globalConfigHttp = OperationGlobalConfigHttp.create<TmdbAuth>()
.withBaseUrl((ctx) => ctx.auth!.user.base_url);
.withBearerToken((ctx) => ctx.auth!.user.access_token);Add new operation
Add a new operation using:
tray-cdk connector add-operation get_top_rated_movies http
where get_top_rated_movies is the operation name and http is operation type.
This would add a new folder under src with the following files:
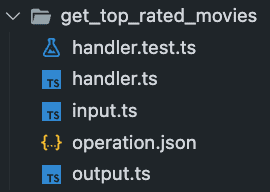
Now we are ready to modify these files to build our operation.
input.ts
This file will define the schema of the input that is needed for the operation
i.e. it will contain type definitions for any query, URI parameters or request body.
The input object should be blank as our endpoint does not require any inputs.
Here's the complete input.ts for your reference:
export type GetTopRatedMoviesInput = {};output.ts
This file will define the structure of the output that the operation returns.
For building the output schema we can use the JSON output from the API Try it step.
{
  "page": 1,
  "results": [
    {
      "adult": false,
      "backdrop_path": "/tmU7GeKVybMWFButWEGl2M4GeiP.jpg",
      "genre_ids": [
        18,
        80
      ],
      "id": 238,
      "original_language": "en",
      "original_title": "The Godfather",
      "overview": "Spanning the years 1945 to 1955, a chronicle of the fictional Italian-American Corleone crime family. When organized crime family patriarch, Vito Corleone barely survives an attempt on his life, his youngest son, Michael steps in to take care of the would-be killers, launching a campaign of bloody revenge.",
      "popularity": 95.013,
      "poster_path": "/3bhkrj58Vtu7enYsRolD1fZdja1.jpg",
      "release_date": "1972-03-14",
      "title": "The Godfather",
      "video": false,
      "vote_average": 8.7,
      "vote_count": 18651
    },
    ...
    ...More movie records
    ...
  ],
  "total_pages": 576,
  "total_results": 11514
}
If you are familiar with Typescript, the above JSON would translate to the following types in Output.ts file:
//movie object
export type GetTopRatedMoviesObject = {
  adult: boolean,
  backdrop_path: string,
  genre_ids: number[],
  id: number,
  original_language: string,
  original_title: string,
  overview: string,
  popularity: number,
  poster_path: string,
  release_date: string,
  title: string,
  video: boolean,
  vote_average: number,
  vote_count: number,
};

export type GetTopRatedMoviesOutput = {
  page: number,
  results: GetTopRatedMoviesObject[], //array of movie objects
  total_pages: number,
  total_results: number,
};
You can copy paste the above snippet into your Output.ts.
handler.ts
This file will contain your main function that defines the operation.
Perform the following steps on this file:
-
Replace the URL inside
http.get()function with/3/movie/top_rated. This is cause we already defined the baseUrl in the global config file above. -
Remove the line
.addPathParameter('id', input.id.toString())from thehandleRequestfunction chain as our request doesn't need a URI parameter. -
The endpoint needs the
bearer <token>to be passed as anAuthorizationheader to the operation.
Since we are using a globalConfig, We don't have to pass the auth for the request separately.
Alternatively if you wish to override the globalConfig, and want to add a bearer token with this request, you can simply add .withBearerToken(ctx.auth!.user.access_token) to the function chain.
info
Notice the ! sign in ctx.auth!.user.access_token. This tells the Typescript compiler that ctx.auth is non-null. Read more about Non-null assertion operator here.
Here's the complete handler.ts code for your reference:
import { OperationHandlerSetup } from "@trayio/cdk-dsl/connector/operation/OperationHandlerSetup";
import { TmdbAuth } from "../TmdbAuth";
import { GetTopRatedMoviesInput } from "./input";
import { GetTopRatedMoviesOutput } from "./output";
import { globalConfigHttp } from "../GlobalConfig";

export const getTopRatedMoviesHandler = OperationHandlerSetup.configureHandler<
  TmdbAuth,
  GetTopRatedMoviesInput,
  GetTopRatedMoviesOutput
>((handler) =>
  handler.withGlobalConfiguration(globalConfigHttp).usingHttp((http) =>
    http
      .get("/3/movie/top_rated")
      .handleRequest((_ctx, _input, request) => request.withoutBody())
      .handleResponse((_ctx, _input, response) =>
        response.parseWithBodyAsJson()
      )
  )
);
handler.test.ts
This file will have functions that will be used to test your operation defined in handler.ts.
A simple test for this endpoint could be to check the total number of movies returned in the response.
As per the documentaion, the endpoint should return 20 movie objects by default.
We can test this with:
expect(outputValue.results.length).toEqual(20);
Here's the complete handler.test.ts code for your reference:
import { OperationHandlerTestSetup } from "@trayio/cdk-dsl/connector/operation/OperationHandlerTest";
import { OperationHandlerResult } from "@trayio/cdk-dsl/connector/operation/OperationHandler";
import { getTopRatedMoviesHandler } from "./handler";
import "@trayio/cdk-runtime/connector/operation/OperationHandlerTestRunner";

OperationHandlerTestSetup.configureHandlerTest(
  getTopRatedMoviesHandler,
  (handlerTest) =>
    handlerTest
      .usingHandlerContext("test")
      .nothingBeforeAll()
      .testCase("should return 20 movies", (testCase) =>
        testCase
          .givenNothing()
          .when(() => ({}))
          .then(({ output }) => {
            // console.log(output);
            const outputValue =
              OperationHandlerResult.getSuccessfulValueOrFail(output);
            expect(outputValue.results.length).toEqual(20);
          })
          .finallyDoNothing()
      )
      .nothingAfterAll()
);
Test the operation
You can test the operation now by:
tray-cdk connector test [OPERATION_NAME]
in our case this is, tray-cdk connector test get_top_rated_movies
> acme-tmdb@1.0.0 test
> jest --config ./jest.config.js "get_top_rated_movies"

 PASS  src/get_top_rated_movies/handler.test.ts
  Operation get_top_rated_movies Test
    ✓ should return 20 results (83 ms)

Test Suites: 1 passed, 1 total
Tests:       1 passed, 1 total
Snapshots:   0 total
Time:        1.154 s, estimated 2 s
Ran all test suites matching /get_top_rated_movies/i.
info
You can also do npm test which will test all operations in the connector's directory.
In case your test results fail, you can visualize the actual API request that was made and the response that was received by logging either or both of them.
Here's how the handler function in handler.ts looks with logging enabled for both request and response:
export const getTopRatedMoviesHandler =
  OperationHandlerSetup.configureHandler<AcmeTmdbAuth, GetTopRatedMoviesInput, GetTopRatedMoviesOutput>((handler) =>
    handler.withGlobalConfiguration(globalConfigHttp).usingHttp((http) =>
      http.get("/3/movie/top_rated")
        .handleRequest((ctx, input, request) => {
          console.log(request.withoutBody()) //log the API request to console before sending
          return request.withoutBody()
        })
        .handleResponse((ctx, input, response) => {
          console.log(response) //log the API response to console
          return response.withBodyAsJson()
        })
    )
  );
Deploy the connector
warning
Before doing a deployment for an actual connector that you build, you should request for a 'namespace'.
Please raise a support ticket to get one for your org.
A 'namespace' is a unique name for grouping Tray organizations. Once you have a 'namespace' you will be able to share connectors between different Tray organizations assigned to you (e.g. cross region deployments)
Prerequisites
1. Create a custom service
Before you deploy the connector, you will have to create a custom service for it. You can also use an existing service (if you created one already).
The service can be created on the Tray UI. Go to the services tab on the app and click new service:

Now add service details on the page as shown below:
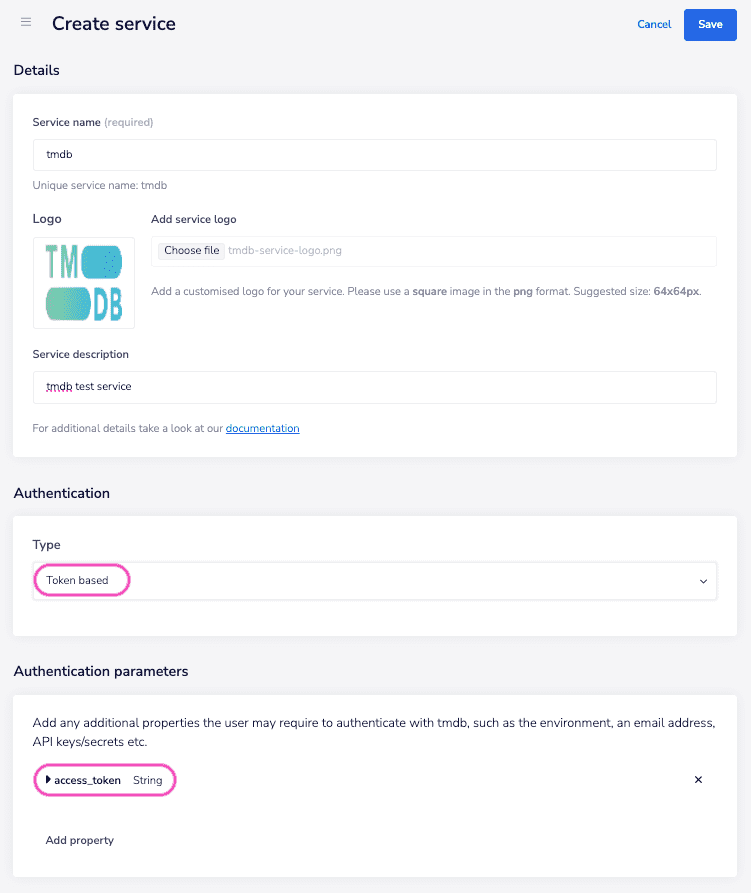
Now save the service. Upon saving, you will see the unique service name.
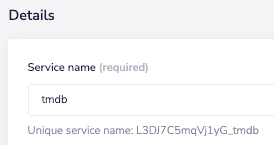
Copy the unique service name (L3DJ7C5mqVj1yG_tmdb in the screeenshot above).
Now edit the service name in the connector.json file. Here is the full connector.json for refrence:
{
  "name": "acme-tmdb", //unique name of the connector - Prefix this with your namespace
  "version": "1.0", //version of the connector
  "title": "Acme tmdb", //Title of the connector on the Tray UI
  "description": "", //connector description visible on the Tray UI
  "service": {
    "name": "L3DJ7C5mqVj1yG_tmdb", //unique service name
    "version": "1"
  },
  "tags": ["service"],
  "isTrigger": false
}
info
You must prefix the connector name with your namespace. e.g. [Namespace]-tmdb
2. Create an API token
Using RBAC Token: You need to create a API user and a issue a token for this user from the Tray UI. More guidance on this can be found here
Although NOT recommended (as your session tokens expire), You may use the approach below:
Using Session Token: You can use a Tray session token in place of RBAC_TOKEN. This can be obtained from the Application tab in Dev tools on Tray UI as shown below:

warning
If you are deploying in EU or APAC region, you need to copy the value of prod_tray_lid_eu or prod_tray_lid_ap respectively
Keep the token value safe as this is crucial for deploying the connector.
Deployment
info
For production deployment, you can either use the Connector Deployment API to deploy connectors.
Or if you are using a deployment tool such as Github actions, you can install the CLI and then deploy using the CLI command (as demonstrated below in this quickstart).
To deploy the connector, you will need to set two environment variables.
-
Run the following command to set
TRAY_API_URL:
export TRAY_API_URL=https://api.tray.io
warning
The above URL (https://api.tray.io) is for the US region.
Your Tray account region is indicated in the Tray app URL.
US -> app.tray.io
EU -> app.eu1.tray.io
APAC -> app.ap1.tray.io
If you are deploying the connector in a different region, the URL would be as shown below:
EU -> https://api.eu1.tray.io
APAC -> https://api.ap1.tray.io
-
Run the following command to set
TRAY_API_TOKEN:
export TRAY_API_TOKEN=<API_TOKEN>
where API_TOKEN is the token you created as a pre-requisite for this step.
With the environment variables set now, you are ready to run the deploy command:
tray-cdk deployment create
The command will execute the tests and then deploy the connector. You should see a response similar to the one shown here:
Running npm compile...

> acme-tmdb@1.0.0 compile
> tsc --build && tscp >> /dev/null

Running npm test...

> acme-tmdb@1.0.0 test
> jest --config ./jest.config.js

 PASS  src/get_top_rated_movies/handler.test.ts
  Operation get_top_rated_movies Test
    ✓ should return 20 movies (144 ms)

Test Suites: 1 passed, 1 total
Tests:       1 passed, 1 total
Snapshots:   0 total
Time:        1.148 s, estimated 2 s
Ran all test suites.
Tests ran successfully
Connector Build Started
Generating schemas for operation get_top_rated_movies
Connector Build Finished
Connector Deploy Started
Connector Deploy Request Sent
Deployment [856b5518-6829-519f-9358-d34b7f848f07] is in progress
The connector should be available within the Tray app in a couple of minutes.
info
You can check the status of the deployment using:
tray-cdk deployment get [CONNECTOR_NAME] [CONNECTOR_VERSION] [UUID]
where UUID is the unique deployment ID you received in the step above and CONNECTOR_NAME and CONNECTOR_VERSION are the values of name and version keys in the connector.json file respectively.
In our case, it will be:
tray-cdk deployment get acme-tmdb 1.0 856b5518-6829-519f-9358-d34b7f848f07
Sharing the connector
info
This step is not required if you used a TRAYSESSIONTOKEN for deploying the connector.
If the connector was deployed using a RBAC token, it must be shared with your user account before you can use it. This is because the connector was deployed using the token issued against API user who is not connected to your Tray user account in any way.
You can share the connector with your Tray user account by:
tray-cdk permissions add [CONNECTOR_NAME] [CONNECTOR_VERSION] --email="[YOUR_TRAY_ACCOUNT_EMAIL_ADDRESS]"
e.g. tray-cdk permissions add acme-tmdb 1.0 --email="john.doe@domain.com
Using the connector
The connector should be available on the UI now. You can now add the auth and do a test run for the operation:

Further reading
- Generating connector using OpenAPI : Learn how to generate a connector from a OpenAPI Specification
- Additional configurations : Learn about ENUMS, Required/Optional, Advanced fields
- DDL guide : Learn from a tutorial on building dynamic dropdown lists within another operation's input
- File Handling : Learn how to handle file upload, downloads though your connector
Sample connectors repo
Make sure you check out the sample connectors repo here for more examples/use cases.